In PS 7 there is a reference to 'nearly 20 ghosts' streaming thru the back wall of the Great Hall. The only ones named (that I can find) are: Nearly Headless Nick, The Bloody Baron, The Grey Lady, The Fat Friar, Moaning Myrtle, Professor Binns, and Sir Patrick Delaney. Sir Patrick isn't a Hogwart's ghost - he's the head of the Headless Hunt. There are references to various other ghosts during Nearly Headless Nick's 500th Death party. And the Hogwarts ghosts say that they don't go to the Shrieking Shack because of the 'rough crowd' that hangs out there. Peeves is not actually a ghost, but rather a poltergeist. Not quite the same thing.
Lady Felula, Gryffindor House
Saturday, January 10, 2009


Friday, January 9, 2009

This pattern is free. Use it as you wish. If you make a fortune with it, it would be courteous to share it with me. ::grins:: I would appreciate credit for the pattern, though. Please do not post this as your pattern. That would be inconsiderate and will cause the Gods of Discourtesy to take notice of you.
I used the House colors, as mentioned in the Harry Potter universe, for my earrings. But any 2 color combinations could be used. You can also change the number of rows of each color. Use more or less rows and/or sets to create your own pattern. I wouldn’t do more than a total of 40 rows (my pattern is 38 rows) or the earrings will be too long and look out of proportion when worn.
Materials & Supplies:
size 0 needles
perl cotton in 2 colors (I think mine is size 5)
2 pieces of lightweight interfacing approx 3/4” x 3 1/2”
needle & thread
a few straight pins
2 split rings or jump rings
2 earring hooks or studs with attached rings
small pliers (to open hooks & add rings)
clear nail polish
tapestry needle to attach fringe
MC - 1 set is 6 rows
CC - 1 set is 2 rows
Cast on 10 stitches in any non-stretchy cast on. Starting with MC, alternate sets until you have 5 sets of MC. Bind off - use a non-stretchy bind off. Cut perl cotton, leaving a tail long enough to sew the scarf’s long sides together. You’ll close the short sides with fringe.
Fold 1 piece of interfacing in half. It should fit nicely inside the folded scarf. If not, trim it to fit. It doesn’t have to go all the way to each end. It’s used to give the scarf some stability and to give you something to sew on when you finish the scarf.
Using the pins, carefully match the stripes and pin through both sides of the scarf to hold it closed while you sew it shut. I used a simple running stitch up the side, then knotted off & pushed the tail inside the scarf. Be sure you enclose all the tails & edges inside so the construction doesn’t show.
I added fringe in both colors, alternating MC-CC-MC-CC-MC; and using the perl cotton. If you have matching shades of embroidery floss, that would give you a softer fringe, and you might be able to add more fringe than I could.
Fold the scarf in half at an angle. Place your first stitch into the scarf with your needle & thread about 1/2” down from the center top. Be sure you do not split any of the perl cotton. Your knot should hide down underneath the scarf stitches next to the interfacing. Take one or two stitches to hold the scarf at an angle. Always go between the stitches of the scarf, never over or through them. This way, your stitches won’t show on the scarf. Slip the needle back up to the folded edge of the scarf. You can carefully stitch across the top edge or not. Do not cut your thread yet.
Now add your findings. First, open the loop at the bottom of the hook, slip the split ring on, and close the loop. You can use jump rings, but they are more likely to open when you don’t want them to. You can use a stud finding with a loop on it for hanging, but you’ll need to slip the stud loop onto the split ring because those loops usually don’t open, and if you do open one, you weaken it seriously.
Once your hook or stud is on the split ring, place the split ring at the center top of your scarf. Be sure the side you like best is facing front, and sew the ring onto the scarf with 2 or 3 stitches. Knot off, being careful the knot slides up right next to the thread. Using the tip of a straight pin, place a tiny dot of nail polish on the thread to lock the knot. Be careful - try not to get any on the perl cotton as the polish can cause a color change as well as creating a hard spot when it dries. You want that on the knot, not on your scarf.
NOTES:
Be very careful when changing from MC to CC that you don’t pull hard on the CC. If you don’t leave a bit of slack on the edge of the scarf, you won’t be able to sew the sides together later.
If you use anything smaller than size 5 perl cotton, you might want to use smaller needles. I chose to use a needle size that would be available to anyone. I normally use some needles I made myself from 12 gauge florist wire by cutting 2 lengths of wire & gluing a large bead to one end. You’ll want to smooth the working end with an emery board or something similar so the cotton won’t catch on it.
You could try using embroidery floss; but remember, it has 6 individual strands and will be much harder to work with. There are a lot more colors available in it, though. You know your own abilities, so try it if you have the patience.

Woke up this morning to find a whole pile of wiggly things on my crafting desk. After some research, I discovered that these are a variety of Flobber worms, commonly known as Rainbow Flobber Worms. Thus far, apparently, no one has discovered where they come from, what they eat, or when they sleep. Their eyes always seem to be open. The only thing that has been discovered about them is that they love to keep your place in a book.
Altho the idea of making Rainbow Flobber Worms is my own, you'll find the pattern I used for to create them here:
http://www.knitlist.com/98gift/crochetworm.htm
I used to make these back when my now-grown children were very young. Now my grandkids play with them. I think the pattern I used back then came from a magazine called Workbasket, which is now out of print.
Tuesday, January 6, 2009
Apparation class assignment

Our Apparation Professor has assigned us a quiz .... to make a cozy. So, since I couldn't seem to stay asleep last night, I decided she might be right. A cup of tea would suit just fine .... but I didn't have a cozy for it. So I found some patterns on Ravelry, chose one & knitted it up. Here's a scan of it. Not the greatest, but you can see the cozy. Some day, I'll get a digital camera with a macro program & perhaps even learn how to use it.
Saturday, January 3, 2009
Snowy Owls
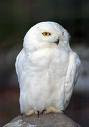
The Snowy Owl was first classified in 1758 by Carolus Linnaeus, the Swedish Swedish naturalist who developed binomial nomenclature to classify and organize plants and animals. The Snowy Owl is a large, diurnal white Owl that has a rounded head, yellow eyes and black bill. The feet are heavily feathered. A distinctive white Owl, their overall plumage is variably barred or speckled with thin, black, horizontal bars or spots. Females and juveniles are more heavily marked than males - adult males may be almost pure white, although they have up to three tail bands. Adult females are distinctly barred throughout, and have from four to six tail bands. Immatures are very heavily barred throughout, and dark spotting may co-dominate or dominate the overall plumage. Intensity of dark spotting varies with the sex of the immatures, females being the darkest. Juveniles are uniformly brown with scattered white tips of down. Snowy Owls are active during the daytime, from dawn to dusk. They have a direct, strong, and steady flight with deliberate, powerful down strokes and quick upstrokes. They make short flights, close to the ground, from perch to perch, and usually perches on the ground or a low post. During hot weather, they can thermoregulate by panting and spreading their wings. Snowy Owls are very aggressive when defending their nest. The Snowy Owl is a bird of Arctic tundra or open grasslands and fields. They rarely venture into forested areas. During southward movements they appear along lake shores, marine coastlines, marshes, and even roost on buildings in cities and towns. In the Arctic, they normally roost on pingaluks (rises in the tundra) and breed from low valley floors up to mountain slopes and plateaus over 1,000 meters (3,000 feet) in elevation. When wintering in the Arctic, they frequent wind-swept tundra with little snow or ice accumulation. At more southern latitudes they typically frequents agricultural areas.
Information found at: http://www.owlpages.com/owls.php?genus=Bubo&species=scandiacus
HLBOE extra credit assignment
Information found at: http://www.owlpages.com/owls.php?genus=Bubo&species=scandiacus
HLBOE extra credit assignment
WHEEEEEE!!!!
I've learned how to add pictures to my blog!! Over there <~~~ you can see 'my' picture. Well, it isn't *really* me .... I mean, that isn't what I really look like ... but I don't wanna scare anyone by posting a 'real' pic, so I found one that looks like what I *wish* I looked like ... and it has a katt, er, cat, too, so it's perfect! If you click on the picture, you'll be magically transported over to the site where I found the picture ... full of the most wonderful art that the artist offers free to the public for personal, non-commercial use. Please don't abuse her generosity, but do feel free to browse her art and maybe use it on your personal site.
And then you'll see a little wizard guy over there, too. He's from my newest group, where I'm doing this marvelous swap. Click on him, and he'll magically transport you over to the group's site so you can see what I'm involved in. Well, one of the things I'm involved in, anyhow!
If my spoilee is reading this ......
Green, green, I see something green .......
something sharp and shiny ........
something long but tiny ......
lean, mean, green machine ......
what's this thing that I have seen?
nope, not gonna tell ya! nyah, nyah, nyah!!! :::snickers:::
And then you'll see a little wizard guy over there, too. He's from my newest group, where I'm doing this marvelous swap. Click on him, and he'll magically transport you over to the group's site so you can see what I'm involved in. Well, one of the things I'm involved in, anyhow!
If my spoilee is reading this ......
Green, green, I see something green .......
something sharp and shiny ........
something long but tiny ......
lean, mean, green machine ......
what's this thing that I have seen?
nope, not gonna tell ya! nyah, nyah, nyah!!! :::snickers:::
Thursday, January 1, 2009
New swap!!
::sigh:: I've been rather, er, forgetful about posting here. Real Life tends to bite me in hidden parts and get in the way, causing me to, ah ...... forget. Things.
Anyhow, I've joined a new swap .... it's on Ravelry and it's called 'Hogwart's Little Bit of Everything Swap' and I think it's going to be so much fun! There will be seven swaps total, over a period of 3 1/2 years ..... that's a long time! But they all sound like so much fun, that I intend to stay for all of them!!
Got to go send a new message to my spoilee ... now that I know who she is :)
Anyhow, I've joined a new swap .... it's on Ravelry and it's called 'Hogwart's Little Bit of Everything Swap' and I think it's going to be so much fun! There will be seven swaps total, over a period of 3 1/2 years ..... that's a long time! But they all sound like so much fun, that I intend to stay for all of them!!
Got to go send a new message to my spoilee ... now that I know who she is :)
Subscribe to:
Posts (Atom)