
This all started with an assignment on owls for HLBOE on Ravelry. The original pattern is here:
http://www.geocities.com/crochetrat/owlfridgie.html
and that is what I used to create the largest nestling.
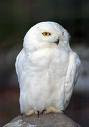
However, I wanted to be able to send this owl overseas; and since that can be expensive, I wanted something smaller than the original nestling. So I tried adapting the spell, er, instructions. That resulted in the middle nestling. (Spell, er, instructions follow.) The smallest nestling, who will live in my kitchen, was created using a double strand of Tofuties black-and-white fingering weight sock yarn. He was a bit fiddly because of the doubled yarn. The other nestlings were created with Red Heart Fall colorway. I changed from magnetic tape to round magnets on the back - they stick better. I use a cool temp glue gun to attach eyes and magnets.
First ... I use the Magic Circle to start projects which call for a starting ring. You'll find instructions here:
http://crochetme.com/Dec_Jan_0405/reads_round.html
My most favorite thing about this? You NEVER have to squish those last few stitches into a circle that isn't quite big enough. You just make the required number of stitches over your magic circle, pull the tail and hey! the starting ring is *exactly* the right size. Every time.
Using your magic circle, and using a size F hook with worsted weight yarn, chain 3, then make 19 dc into the circle. Pull the circle tight. Weave the tail in later. Slip stitch into the top of the chain 3.
Following the original directions, but substituting dc for tc and chain 3 for chain 4, create the owl's head & ears. If your circle tail was long, you don't need to leave a long tail here. If your circle tail is short, tho, cut this tail longer. You'll need one or the other to sew the face halves together when you finish.
Following the original directions again, make the tail, again using dc instead of tc and ch 3 instead of ch 4.
Finishing: Weave in the yarn ends from the tail. Using either the circle tail or the face tail, whichever is longer, on the back of the owl, weave over to the bottom of the split between the two face halves. Weave the sides of the two chain 4's together, then weave back down to the starting circle of dc's and bury the tail. Cut the tail and weave in the other tail.
Glue on a magnet and wiggle eyes. I use twigs from my yard for the owls to 'sit' on. The original spell, er, pattern, calls for chenille. I like the twigs better - they look more natural and each owl gets their own unique look.
1 comment:
they are all SO cute! love their eyes :)
you did a great job!
Post a Comment